LuftWaffe Campaign Tips
Posted: 22 Aug 2008, 14:37
Here are tips, work-arounds, and other observations to make LW Campaign play more enjoyable.
heinkill and some other LW players have helped me understand LW play much better. Thanks, men!
1. Why do the Escorts fail to form up with my Bombers?
Now, I hear some of you saying, "Well, this happened quite frequently in real life."
I say, "80% of the time? I think not!"
It has ruined enjoyable LW Campaign play for many players. I found a work-around, but this will entail some mission planning on the part of the player.
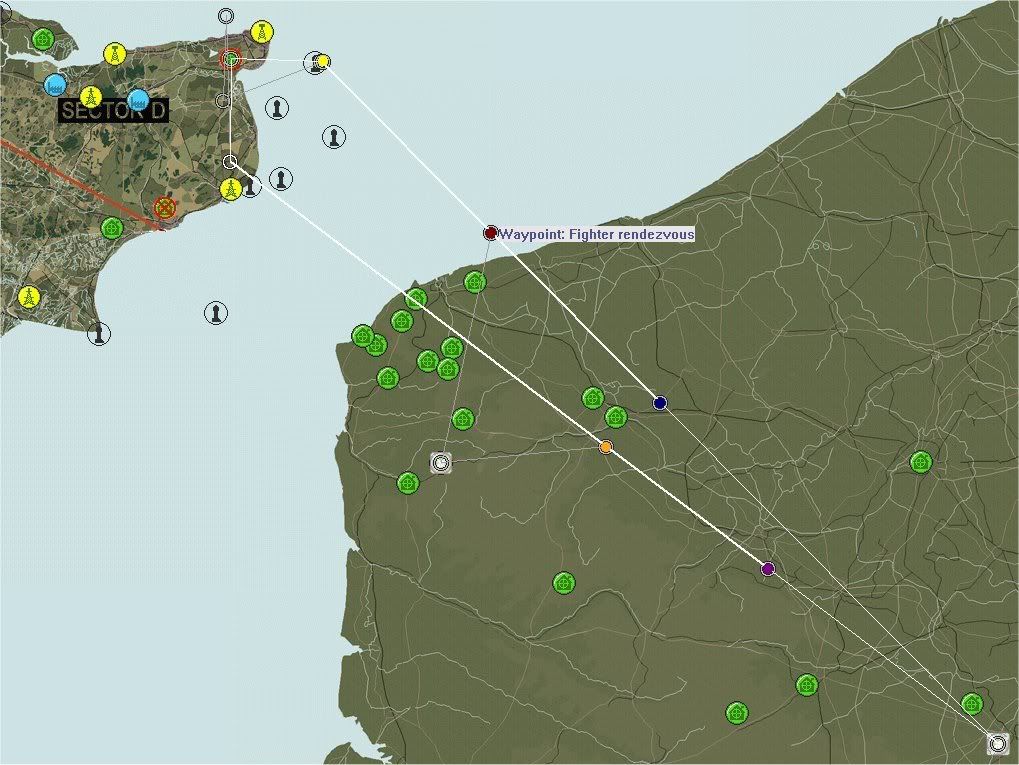
The player needs to move the Fighter Rendezvous Way Point back to the Bomber Rendezvous Way Point, in a nut shell.
Here I a set up a Raid against Manston. One Gruppe DO17s with one Gruppe Emils. The game generates these Way Points.
Bomber Rendezvous Way Point is blue dot.
Fighter Rendezvous Way Point is red dot.
As you can expect, with this planning the two shall never meet!
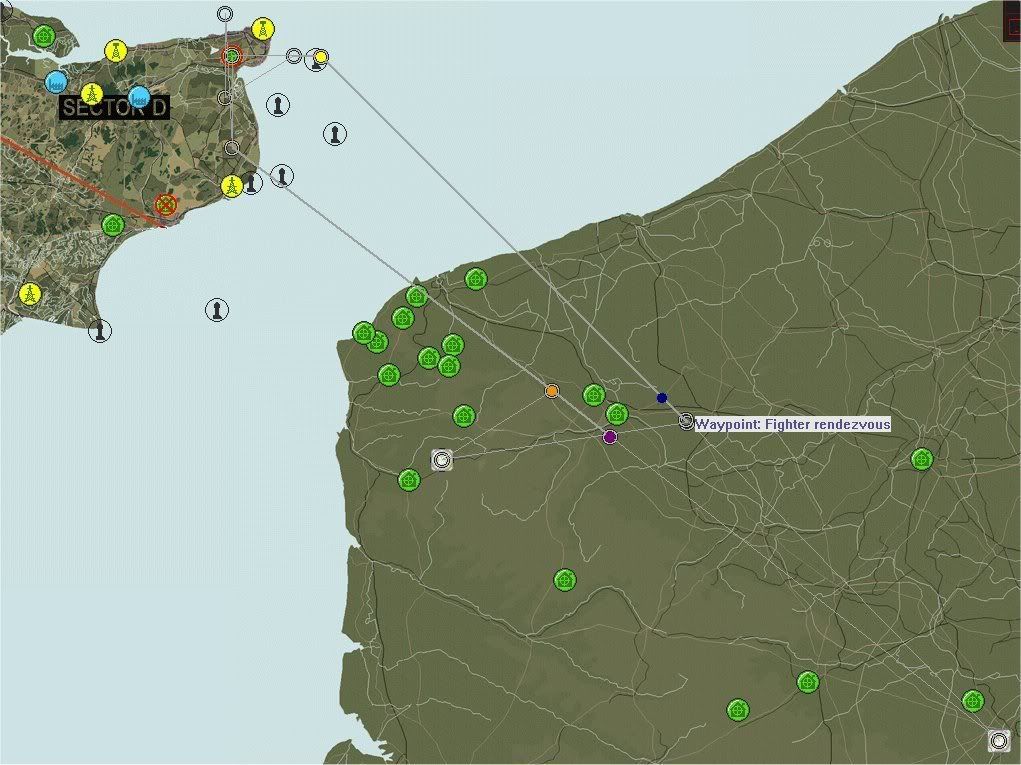
To get them to form up together before the coast, I do this:
1. I drag the Bomber Rendezvous Way Point back a few miles, from the given point, blue dot.
You need not do this all the time, but when fighters are far forward, and bombers deep back inland, I find it makes them form up better.
Sometimes just dragging the Fighter Rendezvous Way Point on top of the given Bomber Rendezvous Way Point, the fighters still race ahead.
2. I drag the Fighter Rendezvous Way Point on top the Bomber Rendezvous Way Point.
In this case, the fighters reached the Rendezvous before the bombers, and went ahead until the bombers reached Rendezvous, and then popped back to and with the bombers. OK.
I planned this only once, and they formed up good, first try.
-----------
Let us consider the Fighter Dispersal Way Points, and Bomber Dispersal Way Points, here, also.
My observation shows that the fighters, when returning, always fly to the Bomber Dispersal Way Point, before going home.
For that reason , with Attached Escorts, I always move the Bomber Dispersal Way Point up to where I want the fighters to disperse.
Usually I drag the Fighter Dispersal Way Point at the same point.
If you get a Bingo Fuel Limit warning, moving the Bomber Dispersal Way Point closer to the fighter home field may save enough fuel to let the planned mission go ahead.
In the above pics, Bomber Dispersal Way Point is purple dot, and Fighter Dispersal Way Point is orange dot.
============================================================================================
2. Bombers always seem to hit the same area on an airfield target.
1. Airfields have numerous Targets, but there is one that I call "The Main Airfield Target".
This is usually just in front of the Large Hangars, on the field. This is where level bomber types will try to lay bombs.
2. For level bombers, use different approaches to the target, that is, try approaching the target from different directions to place bombs on different areas of the target.
2a. Try "bomb in trail" formation versus "level bomb" to place bombs differently.
Also, altitude does effect bombing accuracy. High level bomb drops are less accurate than low level drops.
I have seen that LW level bombers tend to over shoot the target, especially at high altitudes.
3. Stukas behave good as dive bombers. When over the Main Target, they will all split up.. and attack different and individual targets
even if the targets are wide spread through out the Main Target area.
Stukas get personal!
============================================================================================
3. What are the Rules of Engagement for Attached Escort?
I have observed that the code is pretty strict and predictable here. Let us take a simple example:
One Gruppe level bombers, escorted by one Gruppe Emils.
1. The formation is intercepted by an enemy Squadron.
The lead Emil Staffel will peel off and attack them. The other two Emil Staffeln stay with the bombers.
2. Another enemy Squadron attacks the bombers.
The 2nd Staffel peels off and engages the second threat. The last Emil Staffel stays with the bombers.
3. A third enemy Squadron attacks the bombers.
The 3rd Staffel peels off and attacks the third threat.
The bombers are now on their own!
Remember that the game will try to sortie 1 RAF Squadron for every Bomber Staffel you put into the air.
============================================================================================
4. How to make best use of Return Escorts?
heinkill uses these Return Escorts. I am still learning the ropes, here. I have found a way to use Emils as Return Escorts
and they help my bombing ME110s on their way home over the Channel sometimes, if timing is right.
The key here is the Return Escort's Fighter Dispersal Way Point. Go figure!
Basically, I drag the Fighter Dispersal Way Point up near the bomber's Egress or Egress 1st Dogleg Way Point, and the Emils engage any enemy they see.
Still polishing this tactic.... more info later.
============================================================================================
Aloha!
heinkill and some other LW players have helped me understand LW play much better. Thanks, men!
1. Why do the Escorts fail to form up with my Bombers?
Now, I hear some of you saying, "Well, this happened quite frequently in real life."
I say, "80% of the time? I think not!"
It has ruined enjoyable LW Campaign play for many players. I found a work-around, but this will entail some mission planning on the part of the player.
The player needs to move the Fighter Rendezvous Way Point back to the Bomber Rendezvous Way Point, in a nut shell.
Here I a set up a Raid against Manston. One Gruppe DO17s with one Gruppe Emils. The game generates these Way Points.
Bomber Rendezvous Way Point is blue dot.
Fighter Rendezvous Way Point is red dot.
As you can expect, with this planning the two shall never meet!
To get them to form up together before the coast, I do this:
1. I drag the Bomber Rendezvous Way Point back a few miles, from the given point, blue dot.
You need not do this all the time, but when fighters are far forward, and bombers deep back inland, I find it makes them form up better.
Sometimes just dragging the Fighter Rendezvous Way Point on top of the given Bomber Rendezvous Way Point, the fighters still race ahead.
2. I drag the Fighter Rendezvous Way Point on top the Bomber Rendezvous Way Point.
In this case, the fighters reached the Rendezvous before the bombers, and went ahead until the bombers reached Rendezvous, and then popped back to and with the bombers. OK.
I planned this only once, and they formed up good, first try.
-----------
Let us consider the Fighter Dispersal Way Points, and Bomber Dispersal Way Points, here, also.
My observation shows that the fighters, when returning, always fly to the Bomber Dispersal Way Point, before going home.
For that reason , with Attached Escorts, I always move the Bomber Dispersal Way Point up to where I want the fighters to disperse.
Usually I drag the Fighter Dispersal Way Point at the same point.
If you get a Bingo Fuel Limit warning, moving the Bomber Dispersal Way Point closer to the fighter home field may save enough fuel to let the planned mission go ahead.
In the above pics, Bomber Dispersal Way Point is purple dot, and Fighter Dispersal Way Point is orange dot.
============================================================================================
2. Bombers always seem to hit the same area on an airfield target.
1. Airfields have numerous Targets, but there is one that I call "The Main Airfield Target".
This is usually just in front of the Large Hangars, on the field. This is where level bomber types will try to lay bombs.
2. For level bombers, use different approaches to the target, that is, try approaching the target from different directions to place bombs on different areas of the target.
2a. Try "bomb in trail" formation versus "level bomb" to place bombs differently.
Also, altitude does effect bombing accuracy. High level bomb drops are less accurate than low level drops.
I have seen that LW level bombers tend to over shoot the target, especially at high altitudes.
3. Stukas behave good as dive bombers. When over the Main Target, they will all split up.. and attack different and individual targets
even if the targets are wide spread through out the Main Target area.
Stukas get personal!
============================================================================================
3. What are the Rules of Engagement for Attached Escort?
I have observed that the code is pretty strict and predictable here. Let us take a simple example:
One Gruppe level bombers, escorted by one Gruppe Emils.
1. The formation is intercepted by an enemy Squadron.
The lead Emil Staffel will peel off and attack them. The other two Emil Staffeln stay with the bombers.
2. Another enemy Squadron attacks the bombers.
The 2nd Staffel peels off and engages the second threat. The last Emil Staffel stays with the bombers.
3. A third enemy Squadron attacks the bombers.
The 3rd Staffel peels off and attacks the third threat.
The bombers are now on their own!
Remember that the game will try to sortie 1 RAF Squadron for every Bomber Staffel you put into the air.
============================================================================================
4. How to make best use of Return Escorts?
heinkill uses these Return Escorts. I am still learning the ropes, here. I have found a way to use Emils as Return Escorts
and they help my bombing ME110s on their way home over the Channel sometimes, if timing is right.
The key here is the Return Escort's Fighter Dispersal Way Point. Go figure!
Basically, I drag the Fighter Dispersal Way Point up near the bomber's Egress or Egress 1st Dogleg Way Point, and the Emils engage any enemy they see.
Still polishing this tactic.... more info later.
============================================================================================
Aloha!