P-51D cockpit build
-
Piper_EEWL

- Chief Master Sergeant
- Posts: 4544
- Joined: 26 Nov 2014, 14:14
- Location: Germany
Re: P-51D cockpit build
That is so awesome! Where did you get those?
B377&COTS, J3 Cub, B-17G, Spitfire, P-40, P-51D, C172, C182, Pa28, Pa24, T-6 Texan, L-049&COTS, Bonanza V35B

Re: P-51D cockpit build
I always figured those blinkers would have been frozen by corrosion... leave it to you to figure a way to get it to work...and the pressure gauge as well, I'm certain! Constantly raising the bar...but I expect nothing less! Amazing stuff, as always.
Re: P-51D cockpit build
Thanks for the comments guys.
I found them on the internet from separate sources. The blinker turned out pretty funny. I asked the seller of the blinker if it worked and he said he had no way to test it. Having been around SCBA and SCUBA units I guessed it would be on the low pressure side so I asked him to blow in it as a test. He said hmmm and I heard the phone drop on a hard surface. At first I thought he had hung up on me. A moment later he came back on the phone laughing. I asked him what was so funny. He said he was alone in his shop so he had to go to a mirror to see the front of the gauge as he blew into the back of the unit. When the "eye" winked at him he said he stated giggling. He had not thought about testing it before. Worked like a charm.
I don't know if the pressure gauge works but at this time I don't have plans for more than looks in the sim. I know some guys have installed stepper motors in real gauges to make them work but that is beyond my skill level at this time.
I am really enjoying the pit build and I am humbled by everyone's comments.
Thank you
Ed

If at first you do succeed, try not to look too surprised!
Re: P-51D cockpit build
STOP!
I’m going to have a sign made for my shop that says just that. STOP
“Somebody†found O2 gauges online and thought HEY, these would look better than placards AND it would be “fun†and a “good†idea to make the blinker work. I gotta STOP this person.
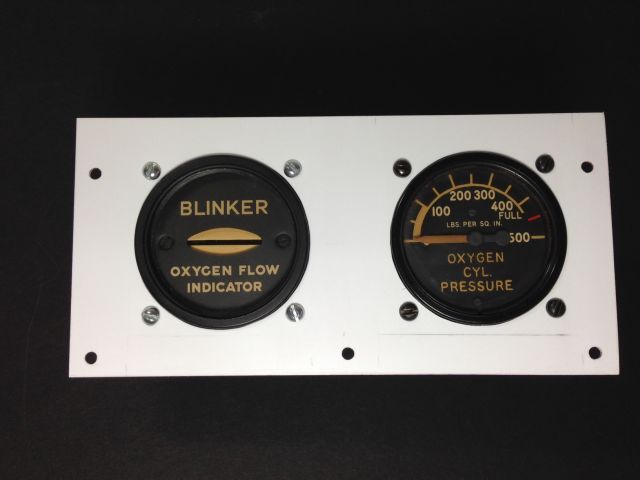
Today I started planning the install of the 2 oxygen gauges. When I initially planned and cut the MIP frame I was going to use placards where these gauges would be to keep the build reasonable. You see, the LCD screen is built into the MIP frame and the power button is in the lower right corner, right behind the O2 gauges. With placards in place I can juuuuuust reach up behind them and access the LCD buttons. The actual gauges are going to make it a challenge to reach the buttons for this old man!
Oh well, the wife said I needed to stay busy in retirement.
Take care
Ed
I’m still trying to figure out how I will make the blinker work and how much I will need to trim the MIP frame for the gauges. I had cut a blank for O2 placards a while back so today I measured and cut it for the gauges.
I’m going to have a sign made for my shop that says just that. STOP
“Somebody†found O2 gauges online and thought HEY, these would look better than placards AND it would be “fun†and a “good†idea to make the blinker work. I gotta STOP this person.
Today I started planning the install of the 2 oxygen gauges. When I initially planned and cut the MIP frame I was going to use placards where these gauges would be to keep the build reasonable. You see, the LCD screen is built into the MIP frame and the power button is in the lower right corner, right behind the O2 gauges. With placards in place I can juuuuuust reach up behind them and access the LCD buttons. The actual gauges are going to make it a challenge to reach the buttons for this old man!
Oh well, the wife said I needed to stay busy in retirement.
Take care
Ed
I’m still trying to figure out how I will make the blinker work and how much I will need to trim the MIP frame for the gauges. I had cut a blank for O2 placards a while back so today I measured and cut it for the gauges.
If at first you do succeed, try not to look too surprised!
Re: P-51D cockpit build
Well...the blinker probably is the easier of the two to get working...perhaps. But if you get the pressure gauge to work, then I will know that you've been dabbling in sorcery, and I'll have to stop watching this because I'll just be too jealous to continue!
Seriously, it looks great, and so much better than placards, yes? I'm pretty confident you'll get both to work.
Seriously, it looks great, and so much better than placards, yes? I'm pretty confident you'll get both to work.
Re: P-51D cockpit build
Hello everyone
I have been working with the blinker gauge and have a few options to make it function. It will not be connected to the sim to get data but will activate when I turn on the oxygen, I think! I’m still looking for components to make this work. At this time I plan for the pressure gauge to be static. Jacques, no sorcery going on here, sorry. That bucket is empty.
I have been working on my parts list and believe everything has arrived. Yeah, I know, famous last words. I’m trying to avoid internet searches where I find “just one more thing I have to have†but it is stressful!!
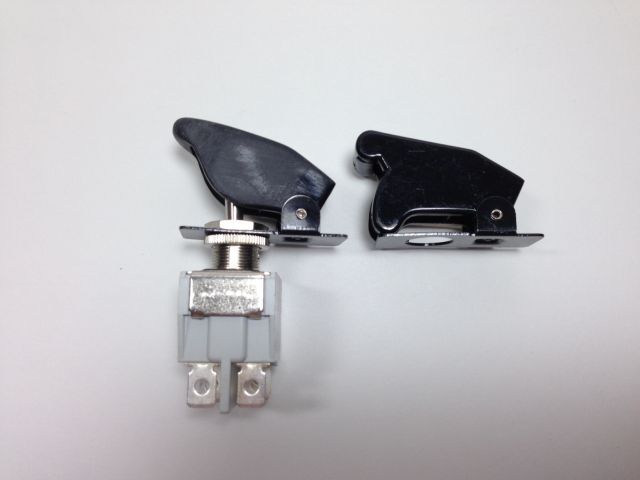
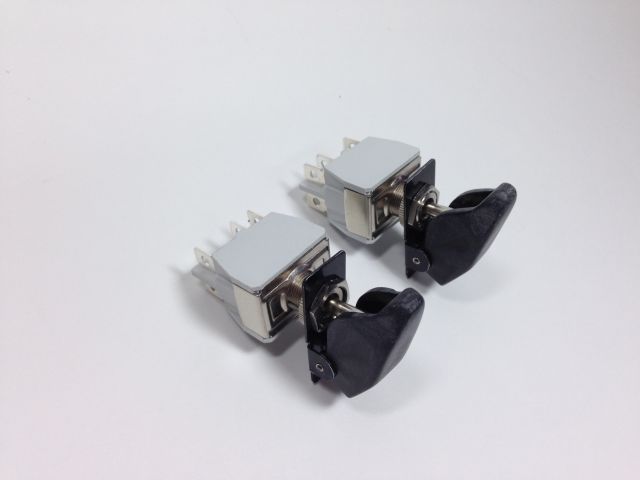
I do have a few pics of today’s project, the radiator air control panel switches. The real switches are momentary left, up and right for the close-automatic-open commands. To avoid breaking the bank or more stressful searches, I’m using three way switches that are momentary-off-momentary with only side to side movement. I have found a way to wire the switch so all three actions will be read by the USB card, I think! At some point I will hook up all of these “I think†components and the lights may dim in Florida.
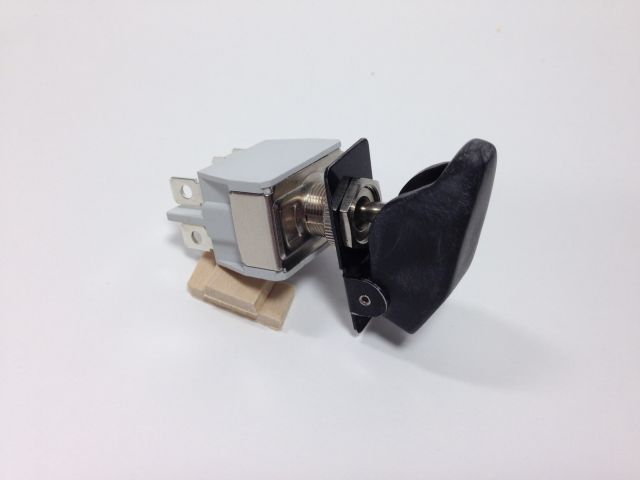
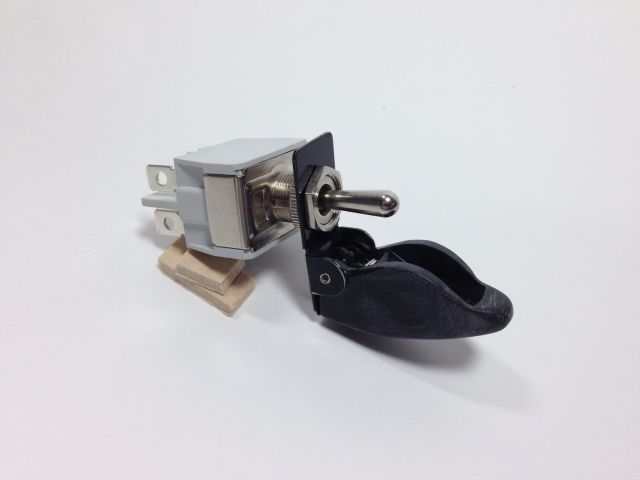
The first pic shows the original switch cover on the right and one modified on the left. The next 2 pics show a switch cover open and closed with the last pic showing both switches.
Thanks for looking
Take care
Ed
I have been working with the blinker gauge and have a few options to make it function. It will not be connected to the sim to get data but will activate when I turn on the oxygen, I think! I’m still looking for components to make this work. At this time I plan for the pressure gauge to be static. Jacques, no sorcery going on here, sorry. That bucket is empty.
I have been working on my parts list and believe everything has arrived. Yeah, I know, famous last words. I’m trying to avoid internet searches where I find “just one more thing I have to have†but it is stressful!!
I do have a few pics of today’s project, the radiator air control panel switches. The real switches are momentary left, up and right for the close-automatic-open commands. To avoid breaking the bank or more stressful searches, I’m using three way switches that are momentary-off-momentary with only side to side movement. I have found a way to wire the switch so all three actions will be read by the USB card, I think! At some point I will hook up all of these “I think†components and the lights may dim in Florida.
The first pic shows the original switch cover on the right and one modified on the left. The next 2 pics show a switch cover open and closed with the last pic showing both switches.
Thanks for looking
Take care
Ed
If at first you do succeed, try not to look too surprised!
Re: P-51D cockpit build
Hello everyone
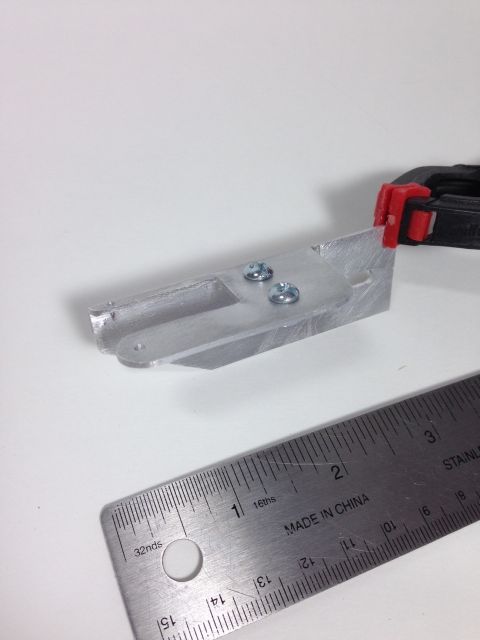
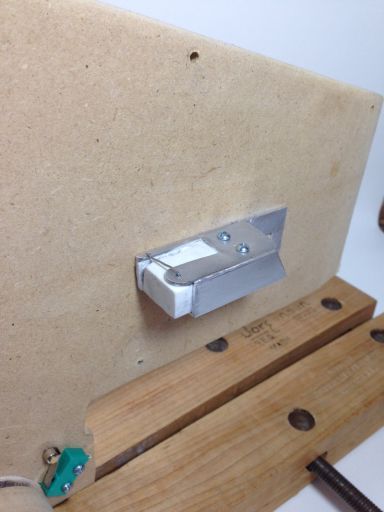
Today I made the WEP bracket. This is something that probably won’t see much action but it will be there if I "feel the need for speed." I will then spend time in the shop repairing the engine damage. I don’t have any drawings so this was made from photos. It’s not 100% accurate but it will do for now.
Take care
Ed
Here is the rough aluminum after construction.
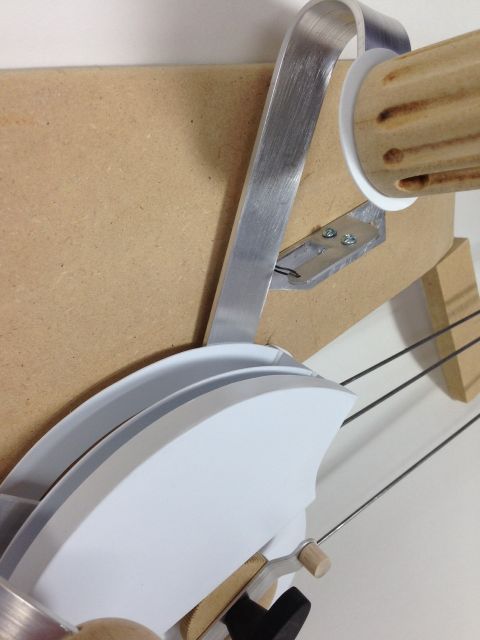
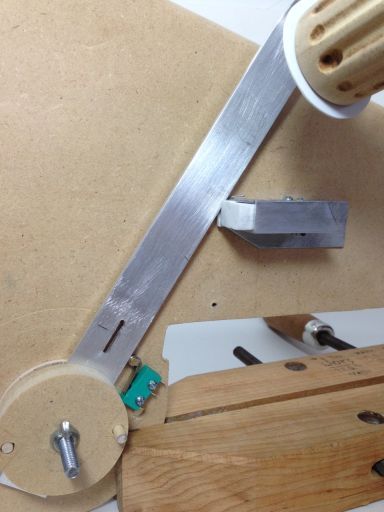
In this pic you can see the throttle lever hitting the wire. I know the real WEP has a wire that is broken when pushed. Right now this is a stopping point for the lever until I make a “breakable wireâ€Â.
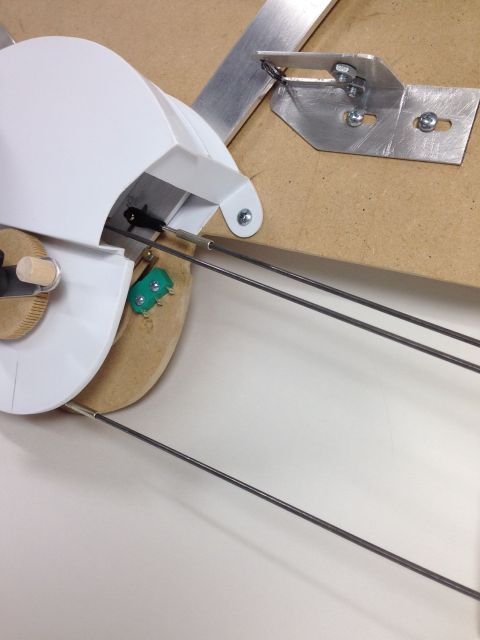
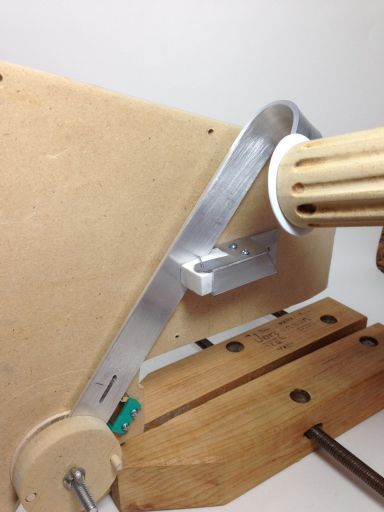
Here you can see that when the wire is broken the throttle lever will depress the green switch to activate the WEP.
Today I made the WEP bracket. This is something that probably won’t see much action but it will be there if I "feel the need for speed." I will then spend time in the shop repairing the engine damage. I don’t have any drawings so this was made from photos. It’s not 100% accurate but it will do for now.
Take care
Ed
Here is the rough aluminum after construction.
In this pic you can see the throttle lever hitting the wire. I know the real WEP has a wire that is broken when pushed. Right now this is a stopping point for the lever until I make a “breakable wireâ€Â.
Here you can see that when the wire is broken the throttle lever will depress the green switch to activate the WEP.
If at first you do succeed, try not to look too surprised!
-
Lewis - A2A

- A2A Lieutenant Colonel
- Posts: 33314
- Joined: 06 Nov 2004, 23:22
- Location: Norfolk UK
- Contact:
Re: P-51D cockpit build
just continually amazed by the effort and genius in working out how to solve all those little issues in the project, good stuff. 
would it be possible to get some actual wire too for the cosmetics, so you could really break through it hehe
cheers,
Lewis
would it be possible to get some actual wire too for the cosmetics, so you could really break through it hehe
cheers,
Lewis
A2A Facebook for news live to your social media newsfeed
A2A Youtube because a video can say a thousand screenshots,..
A2A Simulations Twitter for news live to your social media newsfeed
A2A Simulations Community Discord for voice/text chat
A2A Youtube because a video can say a thousand screenshots,..
A2A Simulations Twitter for news live to your social media newsfeed
A2A Simulations Community Discord for voice/text chat
Re: P-51D cockpit build
What about some sort of durable surface on either side of the gate that gives positive resistance as you move through it, but doesn't need replacing at the end of each flight that calls for WEP.
So many small details to this project, but it seems the pace is picking up!
Thanks for the update, Ed
So many small details to this project, but it seems the pace is picking up!
Thanks for the update, Ed
Re: P-51D cockpit build
Lewis and Jacques
Thanks for your comments.
Your suggestions sound like a great idea. The wire that is there now could appear intact for visual reference but actually be cut. This would allow access to a material that gives resistance yet allow movement to activate the switch. Another thought would be friction material near the switch out of sight.
Thank you for the ideas!
Take care
Ed
If at first you do succeed, try not to look too surprised!
-
Lewis - A2A
- A2A Lieutenant Colonel
- Posts: 33314
- Joined: 06 Nov 2004, 23:22
- Location: Norfolk UK
- Contact:
Re: P-51D cockpit build
thin metal wire, like pipe cleaner wire, use two bits and kinda fold them together so they are together but will easily come apart given enough force?
thanks,
Lewis
thanks,
Lewis
A2A Facebook for news live to your social media newsfeed
A2A Youtube because a video can say a thousand screenshots,..
A2A Simulations Twitter for news live to your social media newsfeed
A2A Simulations Community Discord for voice/text chat
A2A Youtube because a video can say a thousand screenshots,..
A2A Simulations Twitter for news live to your social media newsfeed
A2A Simulations Community Discord for voice/text chat
Re: P-51D cockpit build
Thanks Lewis. I'm trying different materials to see if it will hold but break with pressure.
Ed
Ed
If at first you do succeed, try not to look too surprised!
-
Lewis - A2A
- A2A Lieutenant Colonel
- Posts: 33314
- Joined: 06 Nov 2004, 23:22
- Location: Norfolk UK
- Contact:
Re: P-51D cockpit build
be interesting to see what you come up with, I guess the reusability will be key.
A2A Facebook for news live to your social media newsfeed
A2A Youtube because a video can say a thousand screenshots,..
A2A Simulations Twitter for news live to your social media newsfeed
A2A Simulations Community Discord for voice/text chat
A2A Youtube because a video can say a thousand screenshots,..
A2A Simulations Twitter for news live to your social media newsfeed
A2A Simulations Community Discord for voice/text chat
Re: P-51D cockpit build
Hello everyone
Well, the WEP bracket is definitely a work in progress. I have tested several different types of wire trying to find something that would give resistance to stop the throttle but give way to activate WEP when needed. So far nothing has worked to my satisfaction or will be easy to replace.
So I decided to try a friction method. I was hoping to find something that would not be too noticeable yet work. What you will see below is a white eraser secured with an aluminum side brace. I have cut a slot in the eraser to allow the throttle to pass the wire and activate the WEP switch. The slot is narrow enough to create a stopping point yet the eraser creates friction to let me know I have passed through the wire which is pre-cut. It is more noticeable than I would prefer but some more tweaking or even some silver paint may hide the device.
Please feel free to offer suggestions.
Thanks for looking.
Ed
Here you can see the throttle stopped against the bracket just making contact with the green switch.
In the next 2 pics the throttle has passed the wire and the green switch is compressed to activate WEP.
If at first you do succeed, try not to look too surprised!
Re: P-51D cockpit build
My God  ... This is truly a piece of work... Amazing !!! You have the hands of an artist. Brilliant work all around... You sir damn well deserve a good, hard drink for the efforts you have put into all this. Can't even call this anywhere near amateur. This is professional quality... hands down.
I'd love to see that in person some day... But usually never in Tampa even tho im only 30 minutes North.
I'd love to see that in person some day... But usually never in Tampa even tho im only 30 minutes North.
Who is online
Users browsing this forum: No registered users and 17 guests