Thanks Vince. This looks good!
Ed
P-51D cockpit build
Re: P-51D cockpit build

If at first you do succeed, try not to look too surprised!

Re: P-51D cockpit build
Ed,
I was looking around at some other amps and some of the 50 watt amps are 25 X 2 or 25 watts per channel. You will only be using one channel so they might be too puny. The amp in my post is 40 x 2 which will give you 40 watts which should get it done. So keep that in mind when you look for a amp.
Vince
Re: P-51D cockpit build
Got it Vince.
I have created a file with your notes on this topic and will present it to the official "Buttkicker" for requisition.
Take care
Ed
I have created a file with your notes on this topic and will present it to the official "Buttkicker" for requisition.
Take care
Ed
If at first you do succeed, try not to look too surprised!
Re: P-51D cockpit build
Hello all
I hope everyone is having a great summer! The heat and humidity here in Florida has been too much for my portable A/C unit to cool my shop so I stepped away from that part of the project for a while. I have been working on other components in my home office and wanted to give you an update. Sorry about the pic heavy post!
Take care
Ed
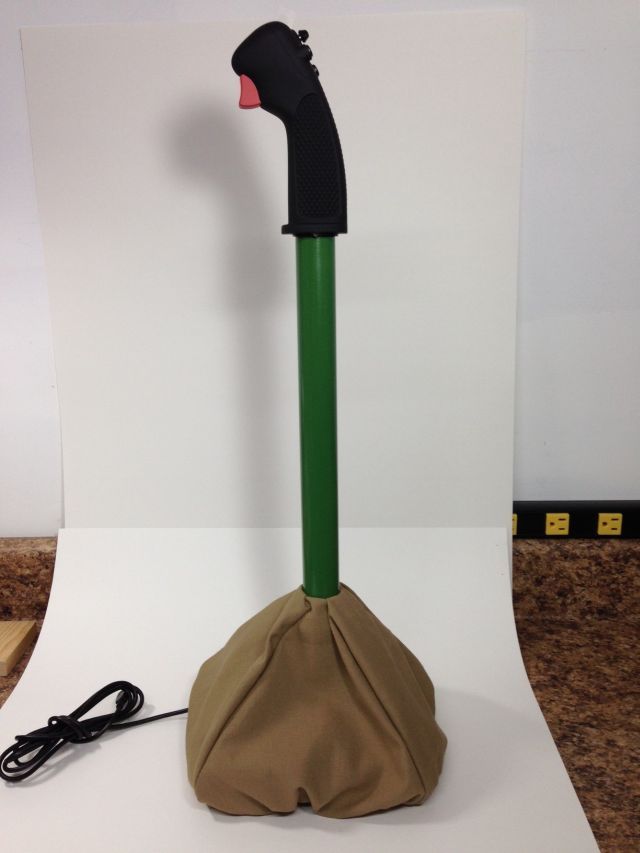
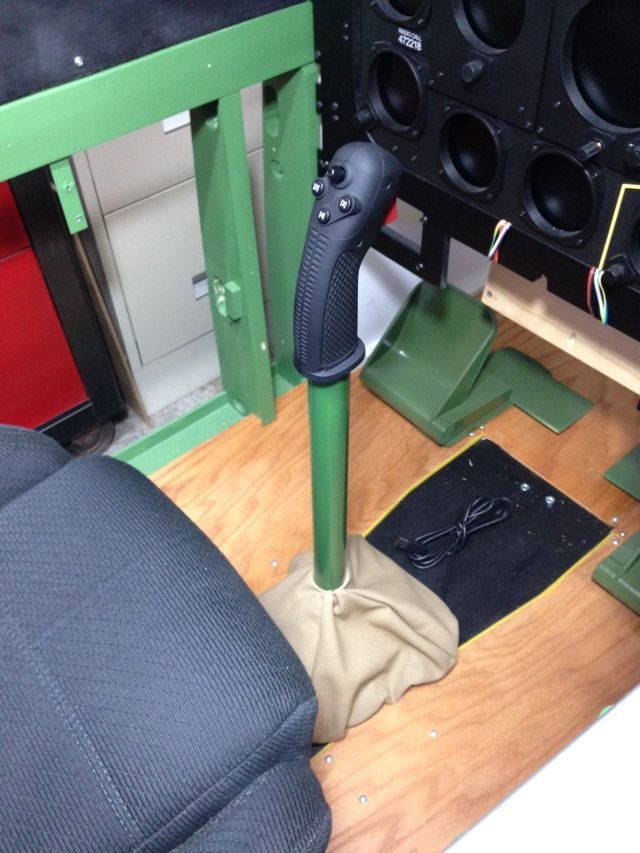
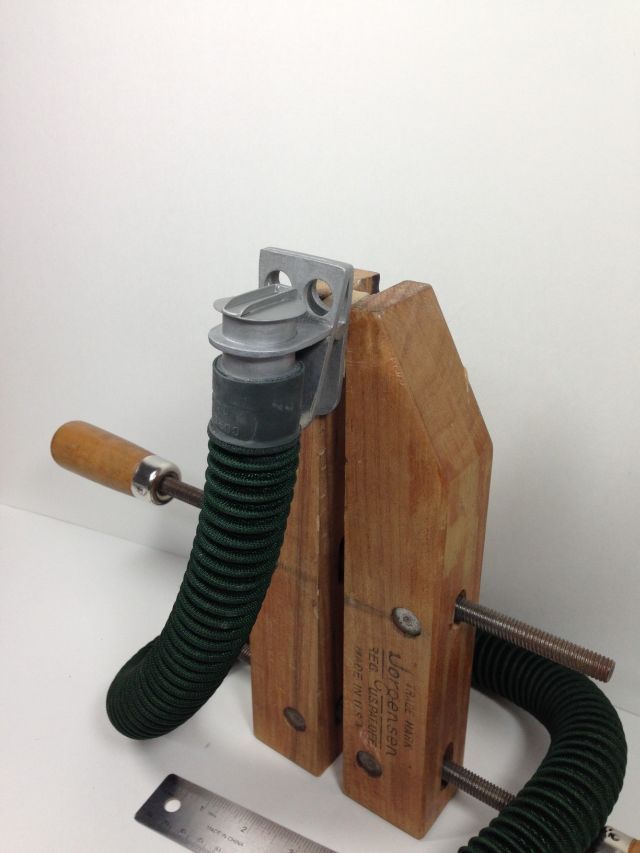
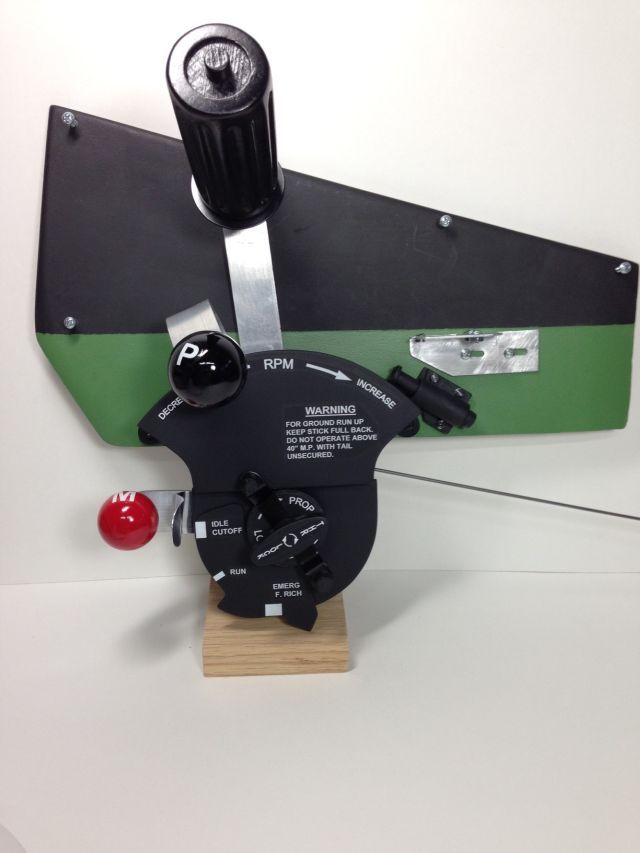
The last pics I posted showed the extension to the stick. I was trying to make the shroud for the base and getting nowhere fast. My wife offered to make the shroud for the base and I think she did a great job. She is a sharp one too. Have you ever made the statement that to do a project you needed a new tool? Well, I am guilty of that and she must have been listening all of these years because she got a new sewing machine to make the shroud!
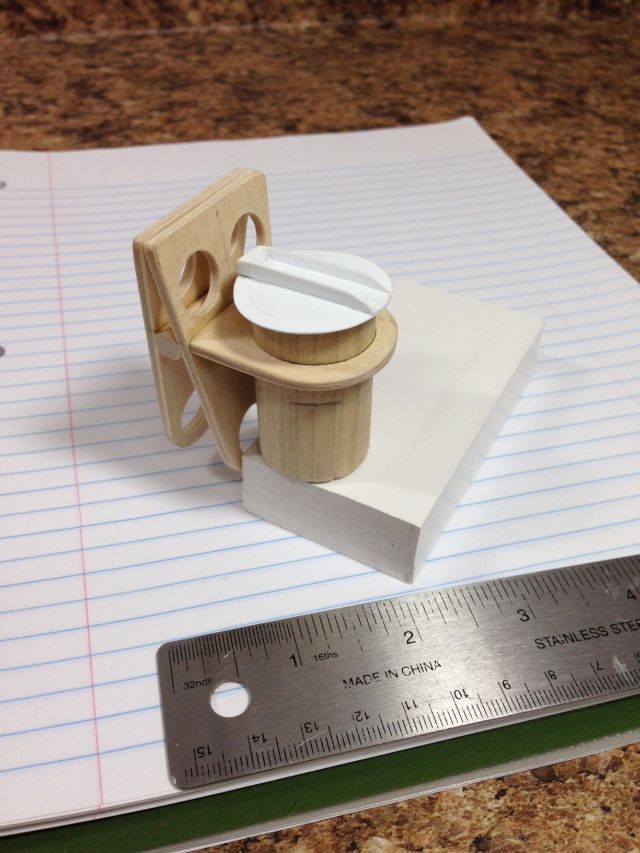
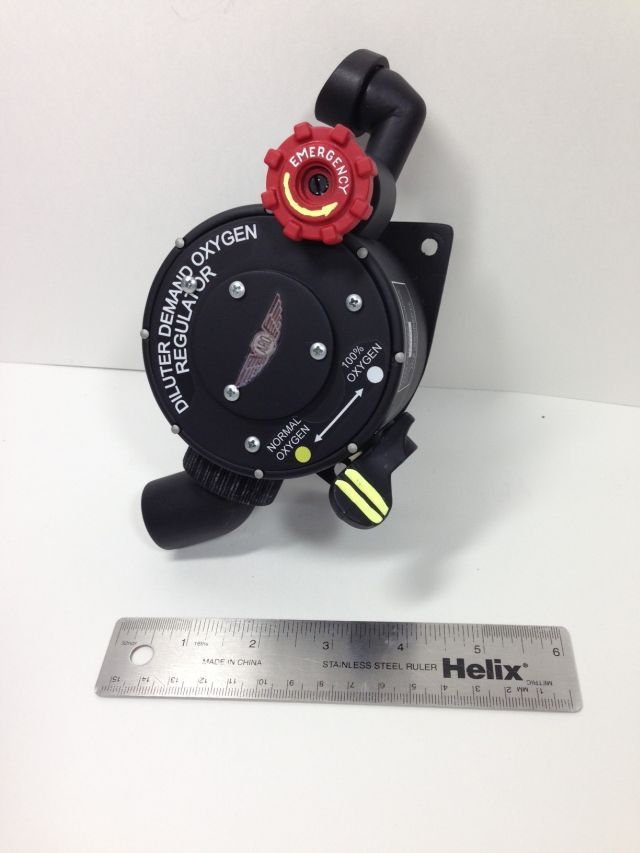
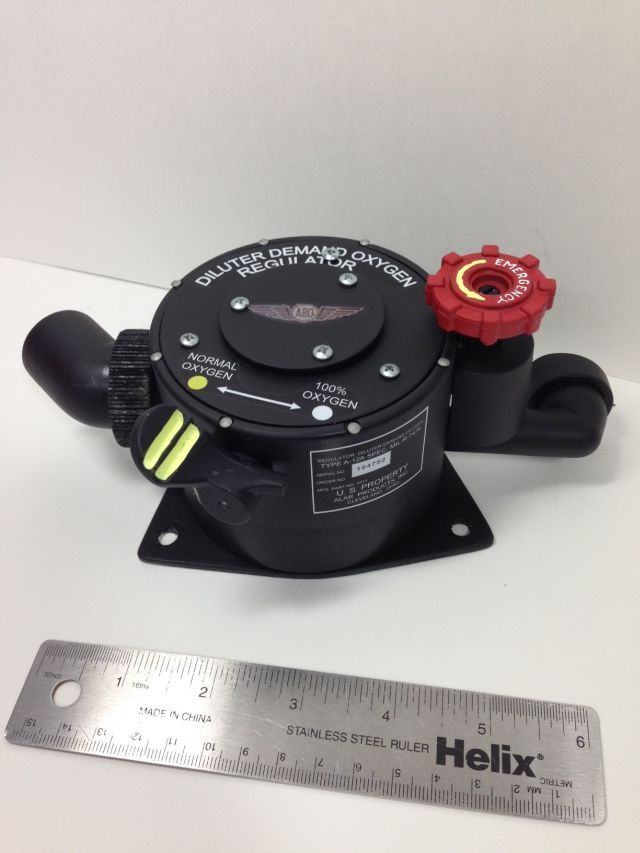
On one of our cooler days I did get into the shop and made the Oxygen fitting and holder. When I brought the finished yet unpainted part into the house to show my wife what I had been up to she said “Why did you make a miniature toilet for your simulator?†I couldn’t say anything because I had had the same thought!
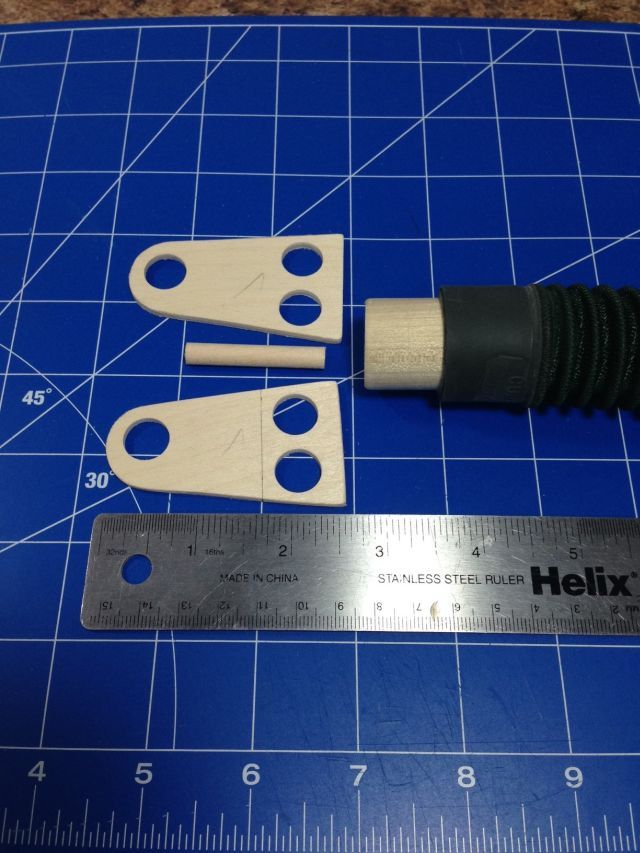
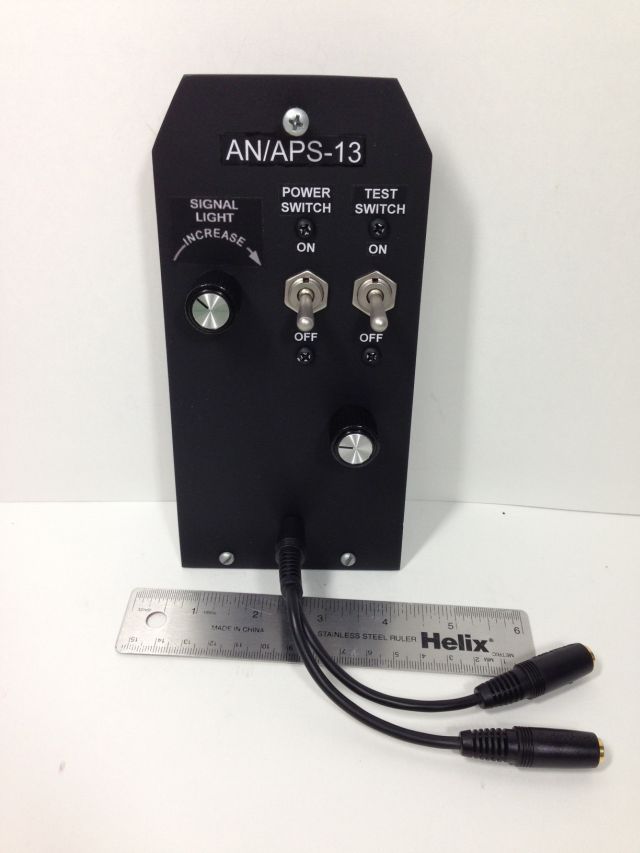
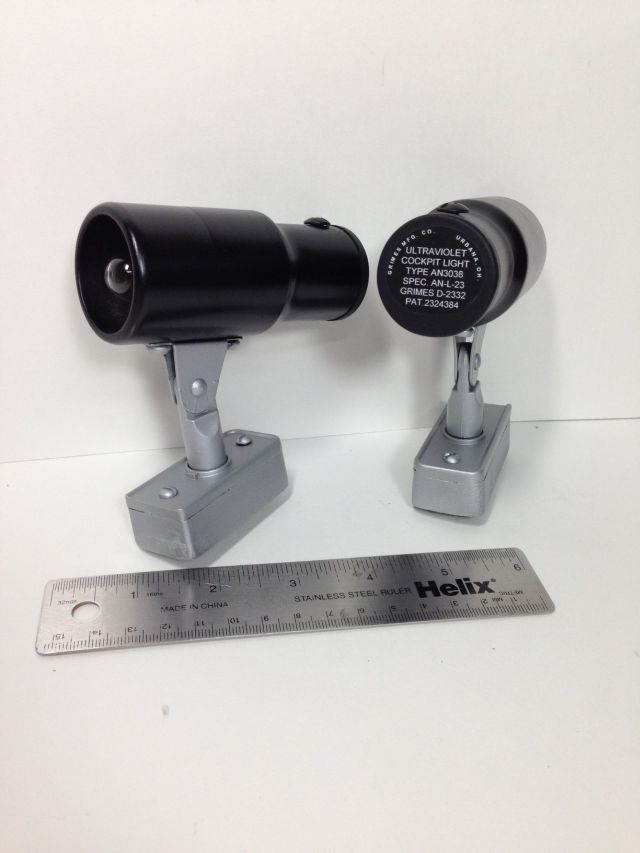
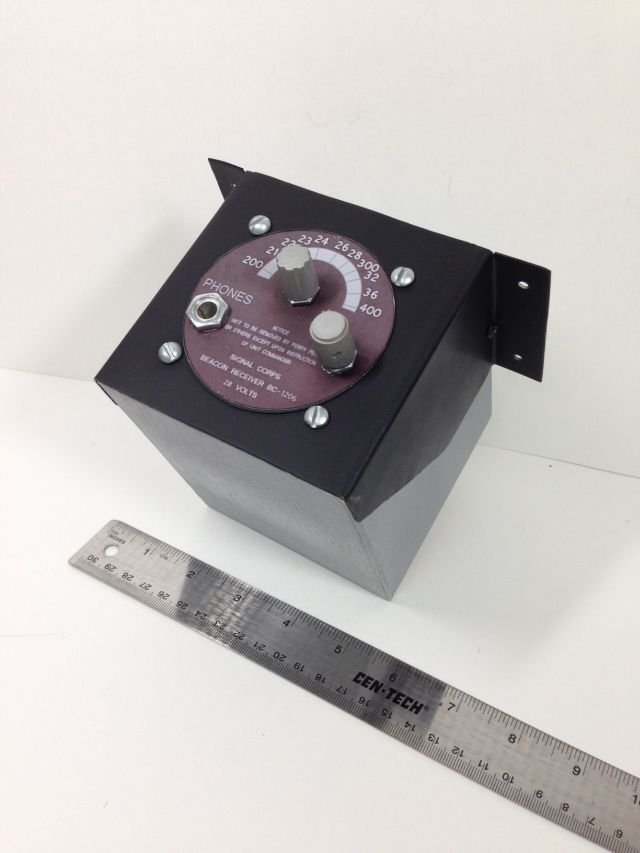
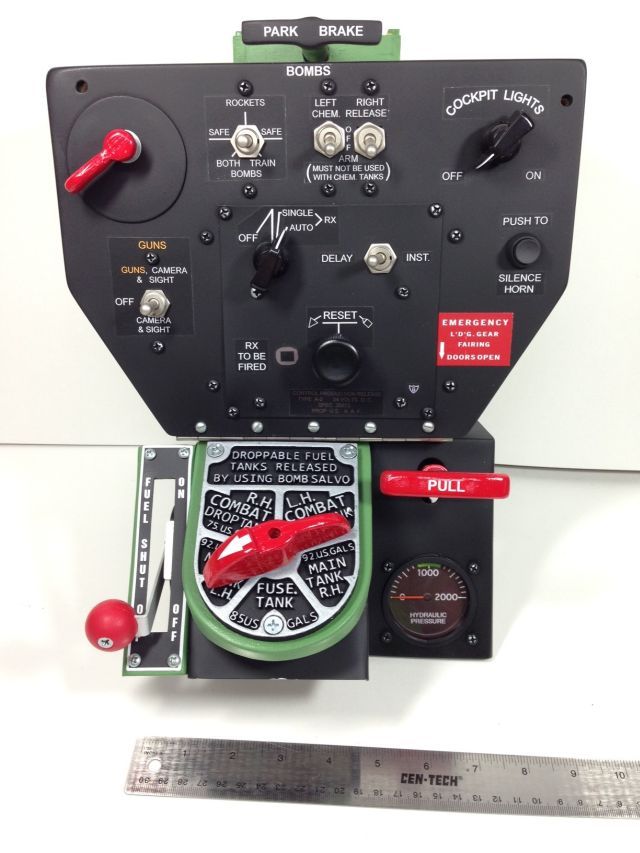
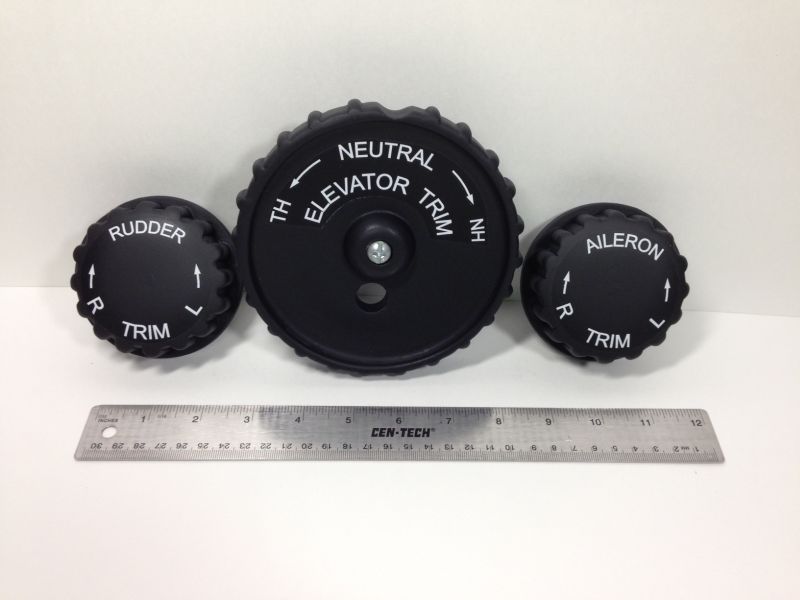
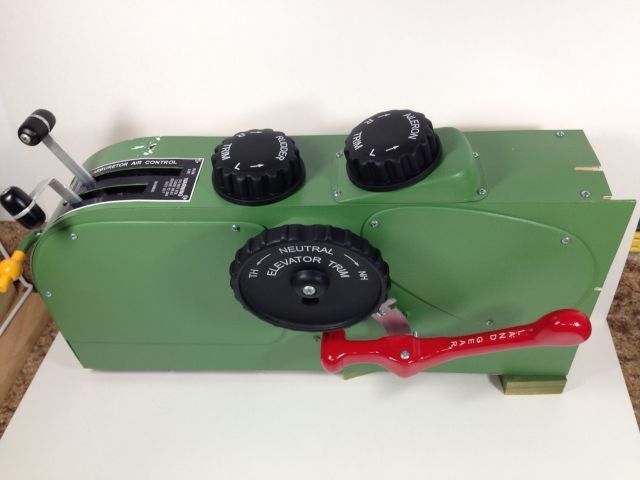
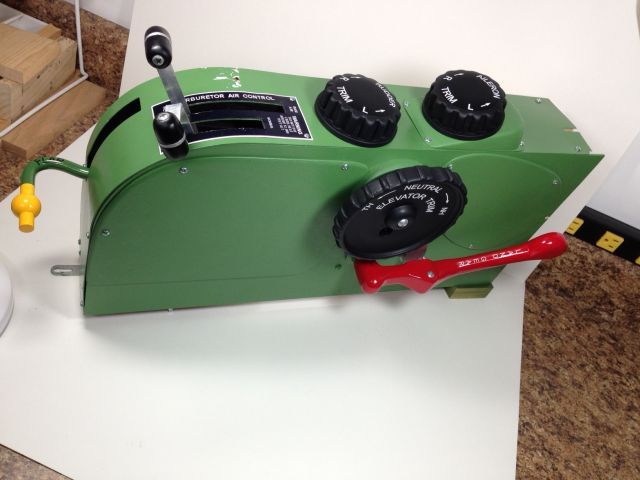
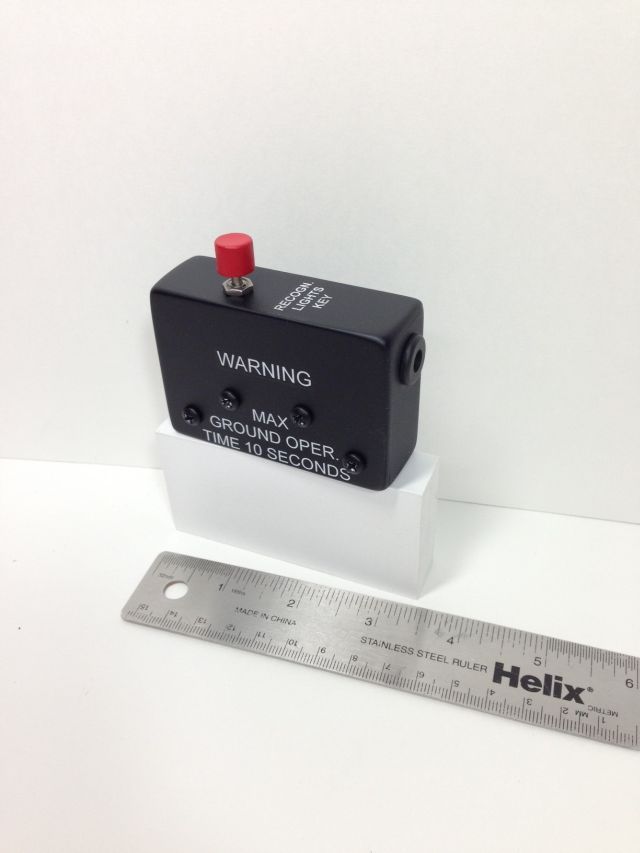
The time in my office was spent creating the labels for all of the parts and here they are in no particular order.


I hope everyone is having a great summer! The heat and humidity here in Florida has been too much for my portable A/C unit to cool my shop so I stepped away from that part of the project for a while. I have been working on other components in my home office and wanted to give you an update. Sorry about the pic heavy post!
Take care
Ed
The last pics I posted showed the extension to the stick. I was trying to make the shroud for the base and getting nowhere fast. My wife offered to make the shroud for the base and I think she did a great job. She is a sharp one too. Have you ever made the statement that to do a project you needed a new tool? Well, I am guilty of that and she must have been listening all of these years because she got a new sewing machine to make the shroud!
On one of our cooler days I did get into the shop and made the Oxygen fitting and holder. When I brought the finished yet unpainted part into the house to show my wife what I had been up to she said “Why did you make a miniature toilet for your simulator?†I couldn’t say anything because I had had the same thought!
The time in my office was spent creating the labels for all of the parts and here they are in no particular order.
If at first you do succeed, try not to look too surprised!

P-51D cockpit build
Ed, anything I might write just doesn't really do justice to the quality of your efforts. So let me just say that you and Darryl and Bill have all set a mighty high bar in the course of your individual cockpit builds!!!
I continue to really....really enjoy seeing the results of the time and effort that all three of you have poured into your projects.
I continue to really....really enjoy seeing the results of the time and effort that all three of you have poured into your projects.
-
Piper_EEWL

- Chief Master Sergeant
- Posts: 4544
- Joined: 26 Nov 2014, 14:14
- Location: Germany
Re: P-51D cockpit build
Wow. Just wow. That looks one simply amazing and it makes the parts really come alive when they're painted and labeled. Everything looks superb.
Happy flying
Happy flying
B377&COTS, J3 Cub, B-17G, Spitfire, P-40, P-51D, C172, C182, Pa28, Pa24, T-6 Texan, L-049&COTS, Bonanza V35B
-
Lewis - A2A

- A2A Lieutenant Colonel
- Posts: 33318
- Joined: 06 Nov 2004, 23:22
- Location: Norfolk UK
- Contact:
Re: P-51D cockpit build
WOW WOW WOW 
Love the photo-shoot you did with the individual parts too, adds a lot to understanding whats been done, the components look so damn well made and just great!
cheers,
Lewis
Love the photo-shoot you did with the individual parts too, adds a lot to understanding whats been done, the components look so damn well made and just great!
cheers,
Lewis
A2A Facebook for news live to your social media newsfeed
A2A Youtube because a video can say a thousand screenshots,..
A2A Simulations Twitter for news live to your social media newsfeed
A2A Simulations Community Discord for voice/text chat
A2A Youtube because a video can say a thousand screenshots,..
A2A Simulations Twitter for news live to your social media newsfeed
A2A Simulations Community Discord for voice/text chat
-
Tomas Linnet
- Senior Master Sergeant
- Posts: 2286
- Joined: 05 Nov 2013, 10:48
- Location: Oksboel, Denmark
Re: P-51D cockpit build
WOW WOW WOW
amazing!
amazing!
Kind Regards
Tomas
Sim: FSX SE
Accu-Sim aircraft in my hangar:
C172, C182, P51 Civ, P51 Mil, B17, Spitfire, P47, B377 COTS,
J3 Cub, T6, Connie, P-40, V35B
A2A Accu-Sim Avro Lancaster Loading:............0.000003% complete, please wait.
Tomas
Sim: FSX SE
Accu-Sim aircraft in my hangar:
C172, C182, P51 Civ, P51 Mil, B17, Spitfire, P47, B377 COTS,
J3 Cub, T6, Connie, P-40, V35B
A2A Accu-Sim Avro Lancaster Loading:............0.000003% complete, please wait.
-
cflord

- Chief Master Sergeant
- Posts: 2744
- Joined: 30 Dec 2004, 17:07
- Location: Powder Springs, Georgia USA
Re: P-51D cockpit build
Ed, there are no words that can describe the awesome work you have done on the P-51 Cockpit. I am totally impressed with your building skills and artistry! I can't wait to see the finished project.
Keep the shiny side up and the dirty side down!
Ret SMSgt Cliff Lord - C-130 Flight Engineer & Mechanic

Keep the shiny side up and the dirty side down!
Ret SMSgt Cliff Lord - C-130 Flight Engineer & Mechanic
Re: P-51D cockpit build
Guys, thank you all for your kind comments.  I am very humbled by what you have said and by the number of views for this build.
I started this project because I wanted a simpit to fly the awesome A2A Mustang. It has taken a LOT longer than I had initially expected (as most of my projects do) but, to quote my wife, "It's OK with me if you retire early but you need to find something to keep you busy." Well, I've met THAT goal!
Yesterday I started working on the wiring for the modified Saitek Switch Panel. Let's just say that it did not go as planned (note, soldering irons get HOT) and I am heading to the shop now to hopefully correct what I "accomplished" yesterday.
Thank you again and take care
Ed
If at first you do succeed, try not to look too surprised!
-
Nick - A2A

- A2A Captain
- Posts: 13802
- Joined: 06 Jun 2014, 13:06
- Location: UK
Re: P-51D cockpit build
Ed,
Just wanted to add my voice to the awe-struck and supportive comments on the thread here. The quality of your work shines through in each photograph and the photography itself is mighty impressive too: I can almost smell the paint and sawn timber in your workshop.
My attention tend to be focused on the GA forums here, but at some point I will definitely sit down and read through the thread properly from start to finish with a large mug of coffee and some cake!
Thanks,
Nick

Re: P-51D cockpit build
Hi Ed
One word mate...quitesimplybl**dyamazingandbeyondawesome !
Can you advise on how you have done the lettering please.
I used Lettraset which involves applying each letter separately...and its a nightmare !. I'm assuming you've used a PC programme to do the lettering but what did you print it onto ?
One word mate...quitesimplybl**dyamazingandbeyondawesome !
Can you advise on how you have done the lettering please.
I used Lettraset which involves applying each letter separately...and its a nightmare !. I'm assuming you've used a PC programme to do the lettering but what did you print it onto ?
Cheers

Gary
Gary
Re: P-51D cockpit build
Hi Nick
Thank you for the kind words. I too had been staying in one area (Mustang) but realized I was missing a lot so I have started to read other topics. We have a great community here and everyone is willing to offer suggestions and solutions and I have learned a great deal.
Gary, great to hear from you! I ran your word through my translator and really appreciate the comment.
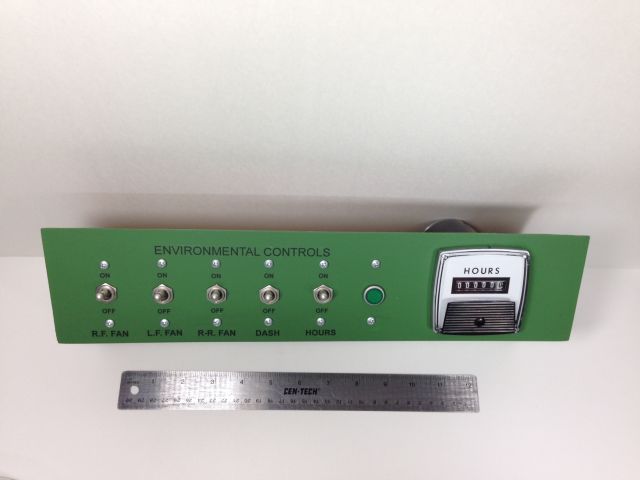
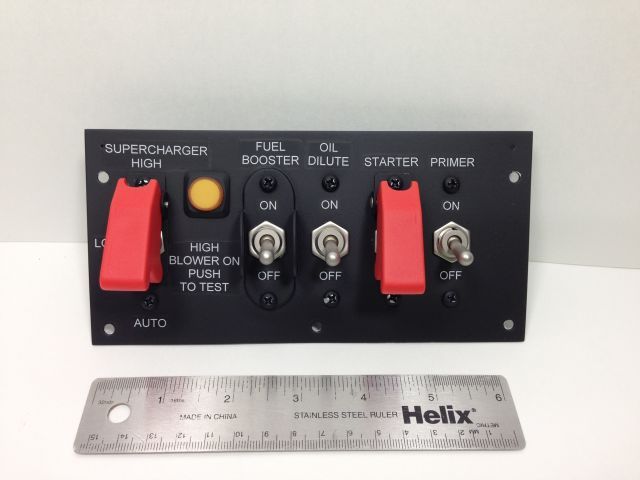
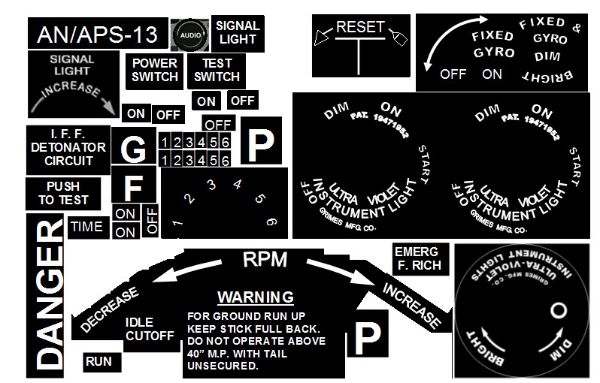
The lettering is decal material like you would use on models. I considered individual letters but realized I would drive myself crazy (a short trip) getting the lettering straight let alone the curved text so I looked into making my own decals. I had never done that before so there was a learning curve and some "select" language when the first two tries did not work as planned. Here is the scoop.
I had black panels in my pit and wanted white lettering but you cannot print white without a specific ($$) type of printer. So I created the lettering I wanted in an old version of MS Publisher by making black or red boxes and inserting white text. More "special" language was used when learning how to make the curved text. I printed this with an inkjet printer on white decal paper to get the white text. With the first 2 printers I tried the black color printed in a gray or dark brown. Even trimming the decal very close to the white lettering would leave the wrong color showing between the letters. So off to the store for a 3rd printer. The winner is an Epson which has a multi color ink package that includes black but has a separate Photo black cartridge. The Photo black matched my black panels. YAY!
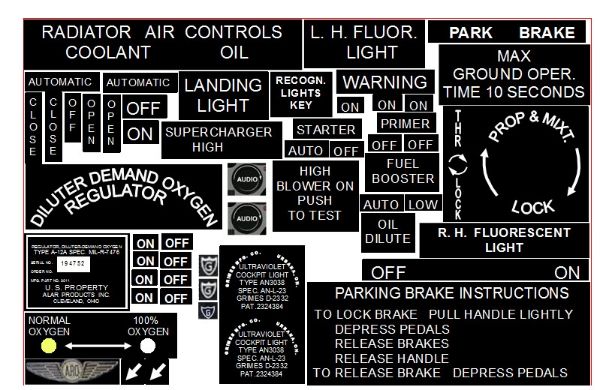
Here are two examples. You will see a few duplicates I included "just in case".
After you print the decals you have to seal them or the ink will just wash off when you place the decal in water. Most decal manufacturers offer suggestions for the time to let the decals dry before sealing (I waited overnight) and recommendations for the sealer. Since I used Testors decal paper I sealed the decals with Testors decal bonder. The decals MUST be applied to a smooth surface or the decal will trap air and give a silver look to the label. I coated the entire panel with Pledge® FloorCare Finish to get a smooth finish. You will find under different names in other countries. This is an acrylic product and dries in 20-30 minutes but I let it cure overnight.
I cut out the decals close to the text, dipped them in water then slid them onto the panels. Follow the decal manufacturers directions regarding how long to keep the decal in the water. This is a somewhat delicate process as the decal can tear. After application the black ink shrank a little giving me a very slight white edge where the white decal material below was exposed. I found an artists pen with a soft tip that dispensed India Ink that was very close to the black ink on the decals and my panels. Using a Jewelers Lighted Headband Magnifier I touched up the white edges. When I applied the top coat of a clear matte finish the decals blended pretty good.
Any questions just ask. I'm not an expert but I learned a few things NOT to do......................
Thanks everyone and take care!
Ed
Thank you for the kind words. I too had been staying in one area (Mustang) but realized I was missing a lot so I have started to read other topics. We have a great community here and everyone is willing to offer suggestions and solutions and I have learned a great deal.
Gary, great to hear from you! I ran your word through my translator and really appreciate the comment.
The lettering is decal material like you would use on models. I considered individual letters but realized I would drive myself crazy (a short trip) getting the lettering straight let alone the curved text so I looked into making my own decals. I had never done that before so there was a learning curve and some "select" language when the first two tries did not work as planned. Here is the scoop.
I had black panels in my pit and wanted white lettering but you cannot print white without a specific ($$) type of printer. So I created the lettering I wanted in an old version of MS Publisher by making black or red boxes and inserting white text. More "special" language was used when learning how to make the curved text. I printed this with an inkjet printer on white decal paper to get the white text. With the first 2 printers I tried the black color printed in a gray or dark brown. Even trimming the decal very close to the white lettering would leave the wrong color showing between the letters. So off to the store for a 3rd printer. The winner is an Epson which has a multi color ink package that includes black but has a separate Photo black cartridge. The Photo black matched my black panels. YAY!
Here are two examples. You will see a few duplicates I included "just in case".
After you print the decals you have to seal them or the ink will just wash off when you place the decal in water. Most decal manufacturers offer suggestions for the time to let the decals dry before sealing (I waited overnight) and recommendations for the sealer. Since I used Testors decal paper I sealed the decals with Testors decal bonder. The decals MUST be applied to a smooth surface or the decal will trap air and give a silver look to the label. I coated the entire panel with Pledge® FloorCare Finish to get a smooth finish. You will find under different names in other countries. This is an acrylic product and dries in 20-30 minutes but I let it cure overnight.
I cut out the decals close to the text, dipped them in water then slid them onto the panels. Follow the decal manufacturers directions regarding how long to keep the decal in the water. This is a somewhat delicate process as the decal can tear. After application the black ink shrank a little
Any questions just ask. I'm not an expert but I learned a few things NOT to do......................
Thanks everyone and take care!
Ed
If at first you do succeed, try not to look too surprised!
Who is online
Users browsing this forum: No registered users and 11 guests