P-51D cockpit build

Arguably the finest fighter aircraft of World War II.
User avatar
Raceguy
A2A Mechanic
Posts: 517
Joined: 14 May 2014, 10:35
Location: FA40, Florida

Re: P-51D cockpit build

Post by Raceguy »

Thanks cbramkamp and Dominique.

I have a 32 inch LCD that will be placed at the seam in the aluminum. After I took the pictures above I built a stand for the LCD base. The base is concealed under the cowling with a 2X2 inch hole in the aluminum for the arm that mounts to the back of the LCD. The bottom of the LCD touches the aluminum hiding the arm and cables. I'll take a pic next time I'm under the hood. :D

Eventually I would like to go with a larger screen or even projection but that is down the road, or runway, and only time, or the crew chief, will tell.

Take care
Ed
Image

If at first you do succeed, try not to look too surprised!

Tomas Linnet
Senior Master Sergeant
Posts: 2286
Joined: 05 Nov 2013, 10:48
Location: Oksboel, Denmark

Re: P-51D cockpit build

Post by Tomas Linnet »

Raceguy wrote:
Eventually I would like to go with a larger screen or even projection but that is down the road, or runway, and only time, or the crew chief, will tell.

Take care
Ed
LOL :mrgreen:
Kind Regards
Tomas

Sim: FSX SE
Accu-Sim aircraft in my hangar:
C172, C182, P51 Civ, P51 Mil, B17, Spitfire, P47, B377 COTS,
J3 Cub, T6, Connie, P-40, V35B
A2A Accu-Sim Avro Lancaster Loading:............0.000003% complete, please wait.

User avatar
Raceguy
A2A Mechanic
Posts: 517
Joined: 14 May 2014, 10:35
Location: FA40, Florida

Re: P-51D cockpit build

Post by Raceguy »

Hello everyone

Yesterday and today I installed the floor and applied the paint and stain. I’m not sure what the center section (now black) will be in its final form but at least I covered the white sub floor beneath for now. I saw that some Mustangs had a yellow edge to the wood in this area so I applied that to mine.

I also corrected the flare gun bag. It was too long which did not look right and it was partially blocking access to the flap lever.

Take care
Ed

Image

Image

Image
Image

If at first you do succeed, try not to look too surprised!

User avatar
Piper_EEWL
Chief Master Sergeant
Posts: 4544
Joined: 26 Nov 2014, 14:14
Location: Germany

Re: P-51D cockpit build

Post by Piper_EEWL »

Looking good. I bet you must be itching to take her out for a spin!
B377&COTS, J3 Cub, B-17G, Spitfire, P-40, P-51D, C172, C182, Pa28, Pa24, T-6 Texan, L-049&COTS, Bonanza V35B

User avatar
Raceguy
A2A Mechanic
Posts: 517
Joined: 14 May 2014, 10:35
Location: FA40, Florida

Re: P-51D cockpit build

Post by Raceguy »

Thanks Piper. Yes I am, especially after what I did today!

I put EVERYTHING in the pit today for a final check. This is the first time it has all been in the pit at one time and it felt really cool! I did find 3 things that I need to correct but that was the purpose of this test.

My wife has seen it in parts and pieces so I brought her out for a look and even got her in the pit! She has been a great supporter of this project. Probably to keep me out of the house!
I still need to add the labels, run all of the wiring, do some final painting like the white area under the dash and install the skin but it feels like I am finally getting closer to completion.

Take care and have a safe Memorial Day weekend.
Ed

Image

Image

Image

Image
Image

If at first you do succeed, try not to look too surprised!

User avatar
Jacques
Senior Master Sergeant
Posts: 2376
Joined: 26 Jun 2011, 17:54
Location: West Coast, USA

Re: P-51D cockpit build

Post by Jacques »

Oh... man, Ed. That has just got to be the most exciting thing to see after all that hard work!
Congratulations on a beautiful build! Did the missus finally have to drag you out and up to bed around Midnight?

User avatar
Dominique
Technical Sergeant
Posts: 503
Joined: 05 Mar 2005, 04:49
Location: French riviera

Re: P-51D cockpit build

Post by Dominique »

I went back to your Feb 3rd, 2015 post, a lot of meat has been put around your then "rough fitting", the skeleton of what we see now ... It looks like the real thing.

Do you still find time to fly or does it consume all your free time :D ?
Dominique
i7-4770 /Nvidia 1080 and MSFS
Proud ownerin FS9 of the P-47 and P-51, in FSX/P3D of the Piper Cub, Cherokee, Comanche, P-40, P-51 civ., Texan, Boeing Stratocruiser, Cessna Skylane and in MSFS of the Comanche

User avatar
Raceguy
A2A Mechanic
Posts: 517
Joined: 14 May 2014, 10:35
Location: FA40, Florida

Re: P-51D cockpit build

Post by Raceguy »

Thank you Jacques and Dominique.

This has been a time consuming project and I have not been flying in a while. I could set up my controls and get in the air but I would rather spend the time planning and building my pit.

My current planning is towards modifying the rudder pedals. You can just see the black front edge of my pedals near the center switch box. They are 16 inches wide with the center of the pedals at 12 inches. The switch box is 10 inches wide so my legs make contact with the switch box. :( I'm looking into remaking or extending the pedals in a wider configuration.

Take care
Ed
Image

If at first you do succeed, try not to look too surprised!

User avatar
Lewis - A2A
A2A Lieutenant Colonel
Posts: 33300
Joined: 06 Nov 2004, 23:22
Location: Norfolk UK
Contact:

Re: P-51D cockpit build

Post by Lewis - A2A »

Looking great! You might wanna contact community member dvm here on the forums as he's done some rudder pedal work recently and might be able to help you our with any tips or advice on how to best approach the mod.

cheers,
Lewis
A2A Facebook for news live to your social media newsfeed
A2A Youtube because a video can say a thousand screenshots,..
A2A Simulations Twitter for news live to your social media newsfeed
A2A Simulations Community Discord for voice/text chat

BrettT
Staff Sergeant
Posts: 280
Joined: 04 Aug 2015, 08:52

Re: P-51D cockpit build

Post by BrettT »

Great Work!

User avatar
Raceguy
A2A Mechanic
Posts: 517
Joined: 14 May 2014, 10:35
Location: FA40, Florida

Re: P-51D cockpit build

Post by Raceguy »

Thanks BrettT

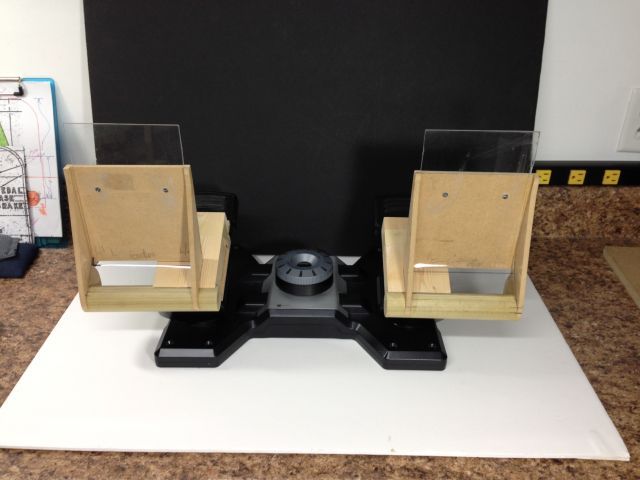
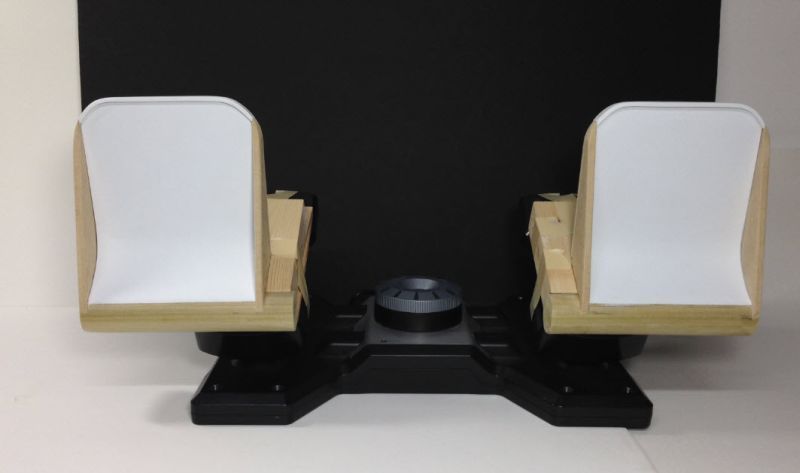
Well, work was started on modifying my rudder pedals as they did not match the Mustang and were too narrow.

Lewis, DVM and I have been trading PM’s and he has offered some great suggestions. Since I did not want to cut into my Saitek Pro Flight pedals I will make replacement foot rests and secure them to the original pedals with extensions to make the unit wider.

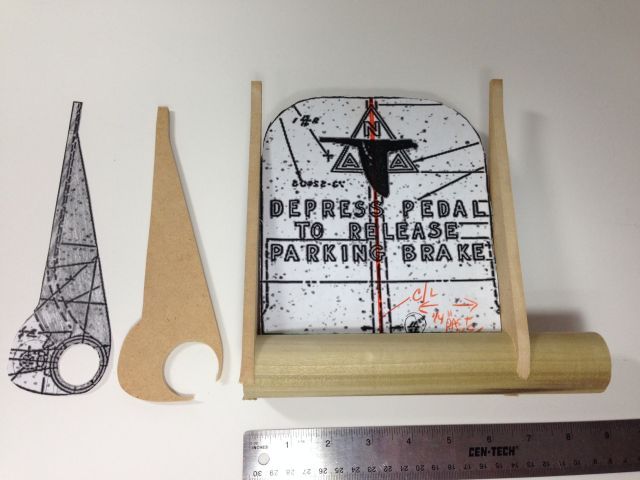
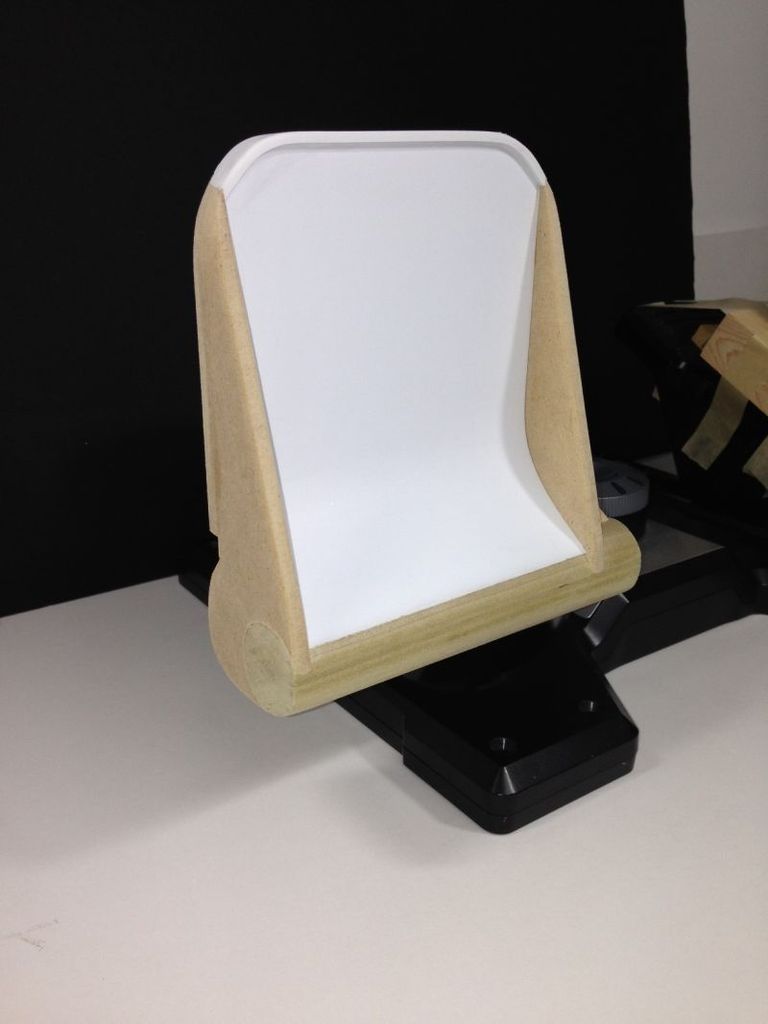
The plans show that the rounded base of the pedals is 1 3/8 inch in diameter and 6 inches wide. I was pleased to find a 1/3/8 inch dowel at the local big box store.

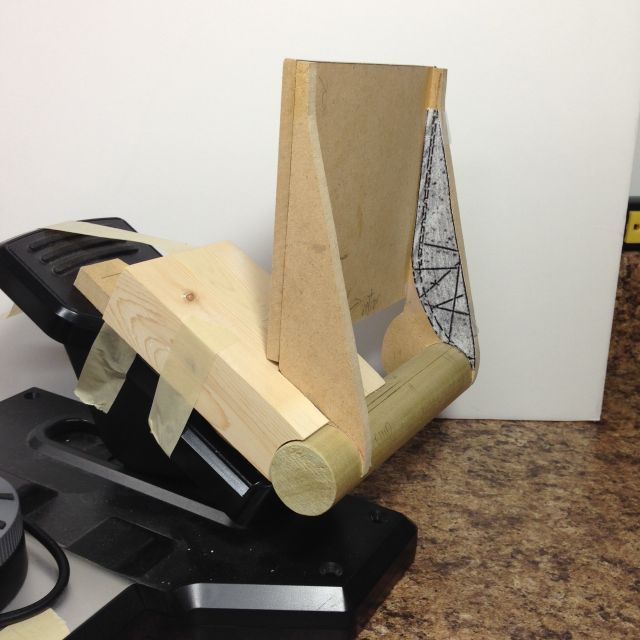
I decided to use MDF for the sides and back since it is strong, easy to work and I can use wood glue to secure it to the dowel at the bottom of the pedal. The flat back of the pedal is more support than visual as it will be covered when finished. I will add a brace behind the back to help apply pressure to activate the toe brakes.

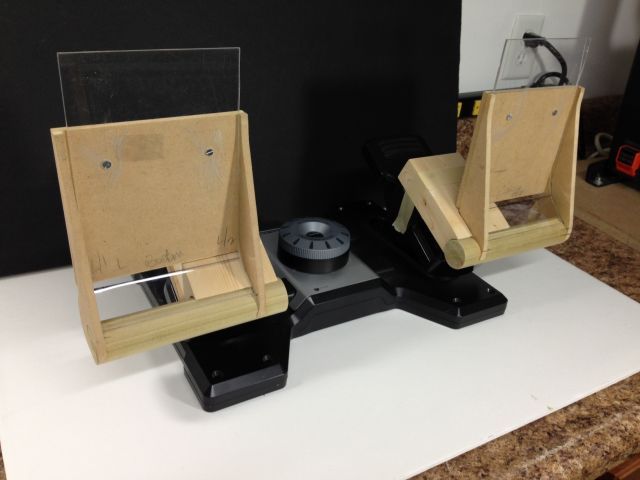
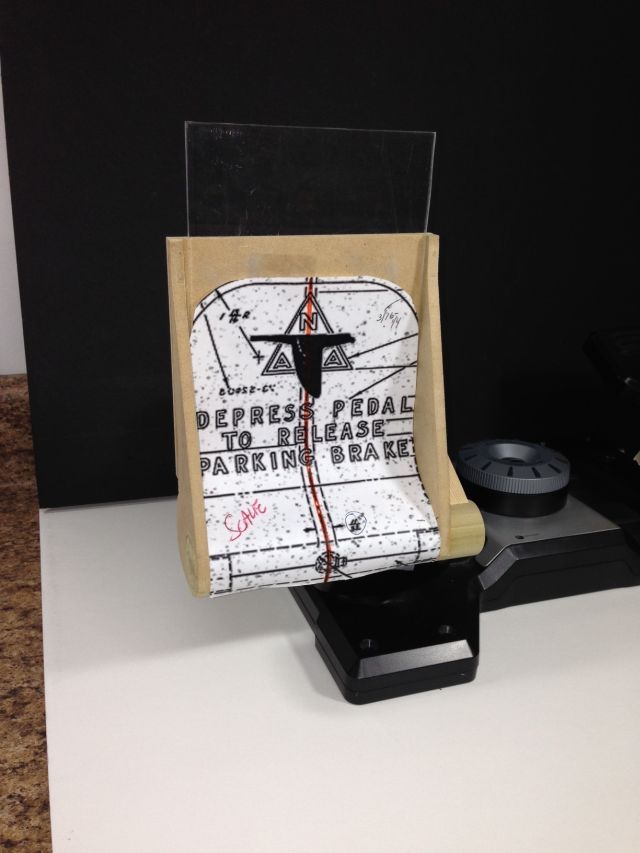
There is a curve in the pedals and making curves always give me a challenge. In the past I have steamed and bent wood, cut kerfs in wood to help it bend and heated acrylic. Today I chose acrylic since I want a smooth top layer.

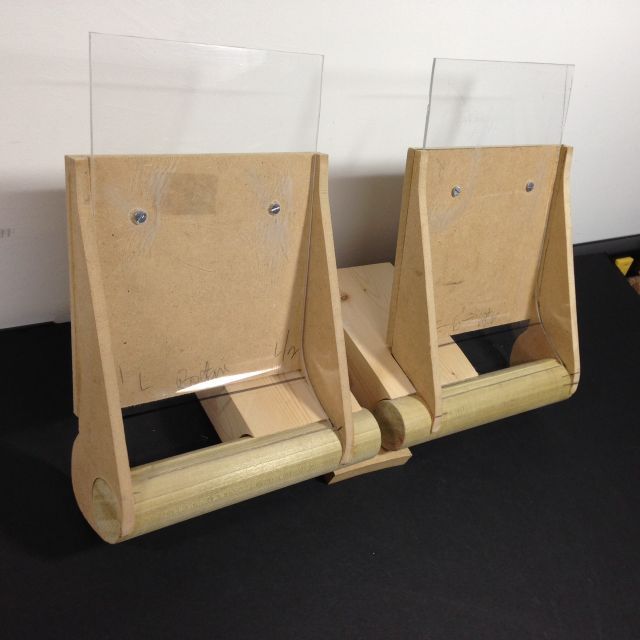
I cut a notch along the length of the dowel to brace the bottom of the acrylic then applied heat and a slight force to make the acrylic bend. Since the acrylic will not show I secured it with 2 counter sunk screws. I am using acrylic here because the top layer will be styrene and I can glue that to the acrylic with no exposed fasteners.

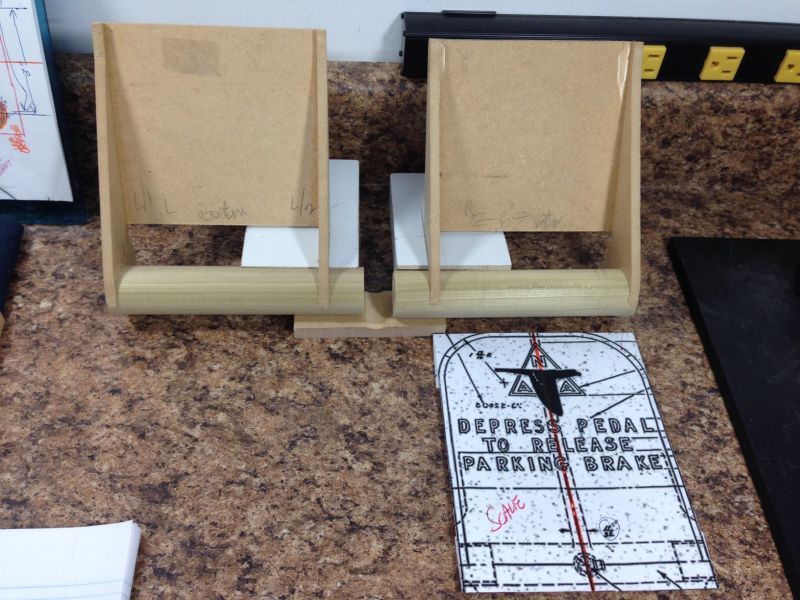
The wood block was sized to match the dowel and will act as a brace and attachment point for the new pedals. To get better contact I drilled a hole in the end of the block that matches the dowel. This will give me a lot of glue surface and I may sneak in a screw or two just to make sure.

The MDF back and sides and the acrylic are oversized and will be trimmed to match the curved top of the new pedals then the styrene top layer will be installed. I have not decided how the wood block will be attached to the original pedals but I am leaning towards nuts and bolts. Hmmm, another trip to the hardware store!

Thanks for looking and all of your comments. I am humbled by the number of views and the very kind words everyone has offered.

Take care
Ed

Image

Image

Image

Image

Image

Image

Image

Image
Image

If at first you do succeed, try not to look too surprised!

User avatar
dvm
Senior Master Sergeant
Posts: 1873
Joined: 19 Jan 2012, 19:53

Re: P-51D cockpit build

Post by dvm »

Ed,

I was talking about our exchange with my wife and related to her that after seeing your progress with your pedals the only thing that comes to mind is what an outstanding craftsman you are and compared to your creations I am a hack. I am humbled by the fact that you sought my advice. I have learned more from you than you could ever learn from me. I may try the acrylic idea for the top of my throttle project. Looking forward to your progress.

Vince

User avatar
Lewis - A2A
A2A Lieutenant Colonel
Posts: 33300
Joined: 06 Nov 2004, 23:22
Location: Norfolk UK
Contact:

Re: P-51D cockpit build

Post by Lewis - A2A »

Ahh great stuff, glad you and dvn hooking up was great for both of you 8)

cheers,
Lewis
A2A Facebook for news live to your social media newsfeed
A2A Youtube because a video can say a thousand screenshots,..
A2A Simulations Twitter for news live to your social media newsfeed
A2A Simulations Community Discord for voice/text chat

User avatar
Raceguy
A2A Mechanic
Posts: 517
Joined: 14 May 2014, 10:35
Location: FA40, Florida

Re: P-51D cockpit build

Post by Raceguy »

Hello everyone

Vince, your pedals look great. I have no more skills than anyone else; I just have more time, for the trial and error, and error, and error. When my wife and I discussed my retiring early she told me the key was to keep busy. Translation, keep out of her way! And boy has this project kept me busy.

Remember the quote that is in my signature below. If at first you do succeed, try not to look too surprised!
You guys only see what I let you see. :lol: There is a corner of my shop referred to as the “Well, that didn’t work” corner.

When you are ready to work with acrylic let me know. I can tell you how to heat it and burn your fingers so you won’t have to. :roll:

Today I rounded the top of the frame, glued the white styrene over the acrylic and added the top trim. Not a lot to show for most of the day in the shop. :(

Take care
Ed

Image

Image
Image

If at first you do succeed, try not to look too surprised!

User avatar
dvm
Senior Master Sergeant
Posts: 1873
Joined: 19 Jan 2012, 19:53

Re: P-51D cockpit build

Post by dvm »

Your pedals are coming along nicely. I will likely take you up on advice bending the acrylic. I would like to make the top (cover) for my throttles in one piece if possible. I have been retired for good for quite a few years. Staying busy is the answer to keeping one's demons at bay. :D

new reply

Return to “P-51 Mustang (Military & Civilian)”

Who is online

Users browsing this forum: No registered users and 6 guests